
Customizing Your Blog Design
From the left sidebar, click Design to begin customizing the look and feel of your blog.
From the left sidebar, click Design to begin customizing the look and feel of your blog.
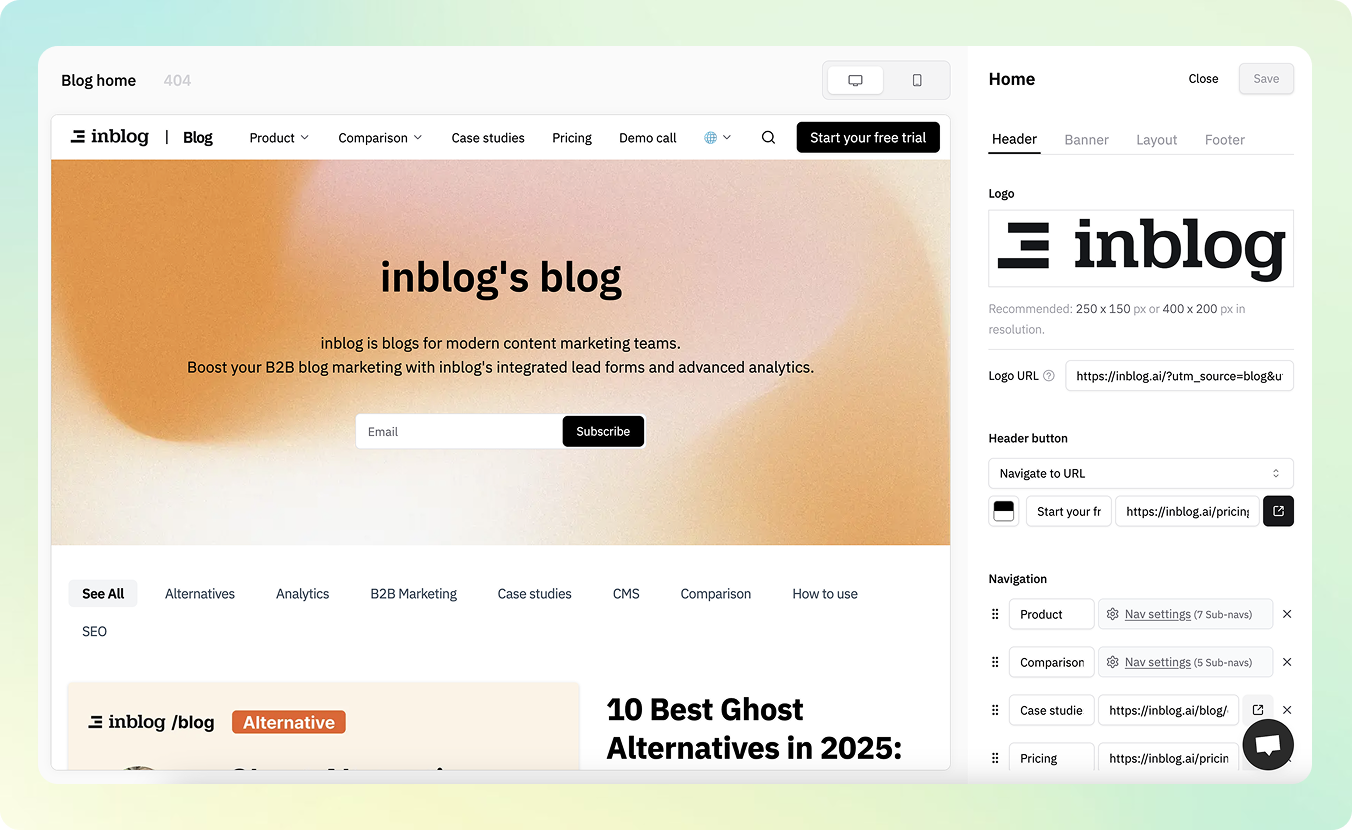
Header
-
Logo
- Upload your logo and set a destination URL for logo clicks.
- Recommended size: 250×150 or 400×200
-
Header Button
- Choose from two button types:
- Subscribe Form
- "Display a lead capture form when the button is clicked."
- Form content and settings can be configured in the Form tab.
- Navigate to URL
- Link the button to any internal/external URL.
- Subscribe Form
- Choose from two button types:
-
Navigation Bar
- Primary Navigation
- Set a static menu bar at the top of your blog.
- Dropdown Menu
- Configure dropdown items that appear when a menu item is clicked.
- Primary Navigation
-
Custom Code
- You can also inject custom CSS or HTML to fully match your website's brand guidelines.
Banner
-
Blog Title & Description
- Customize the title and description text shown on your blog's homepage.
-
Text Color
- Set the color of your banner text.
-
Banner Layout
- Choose text alignment: Left-aligned or Center-aligned.
-
Background (Color or Image)
- Customize the banner background:
- Set a solid background color
- Or upload a background image
- Recommended sizes: 1680×450 for desktop / 390×300 for mobile
- Customize the banner background:
-
Custom Code
- You can also inject custom CSS or HTML to fully match your website's brand guidelines.
Layout
-
inblog offers three default post layouts to choose from.
-
You may also apply additional visual customization via custom code.
- Custom Code: Use HTML/CSS for fully tailored layouts.
Footer
-
Add your company information to the footer section.
-
Like other areas, the footer can also be customized with code.
Entering and Saving Custom Code
If the code fields are not visible or cannot be edited, first check your blog's plan. Custom code settings are locked on the Free plan. If custom code is available for your blog, open Design → Common and turn on the Custom header code, Custom banner code, or Custom footer code switch for the area you want to change. With the switch off, the page shows a Switch ON to insert custom ... code. message instead of the editor. For the post-list layout, enable its custom code setting in the Layout section.
The Custom Code areas under Header, Banner, Layout, and Footer all use the same editor. It has an HTML box on top and a Style CSS box below. Enter CSS rules directly or wrap them in <style> tags as shown below. New or edited CSS rules are automatically wrapped in <style> tags when you apply the code.
<style>
  h2 {
    font-size: 20px;
  }
</style>
Unchanged saved CSS is preserved. Editing other settings or only the HTML does not convert existing CSS. To activate previously saved CSS without tags, review it and explicitly wrap it in
<style>tags. Check the design in the preview before saving. Incomplete CSS rules or<style>blocks, and preset names such ascover, produce an error in red text. Do not add HTML or scripts to the CSS field. If an existing field already contains them, you can edit its CSS contents while leaving the other code, style attributes, and order unchanged.
Your code is applied to the blog only after both of these steps:
- Click
Apply custom code. The code is validated and reflected in the preview inside the editor. It is not saved yet. - Click
Save, pinned to the top of the settings panel. Only after this step does the change go live on your blog.
If you click Apply custom code and then leave the Design screen without saving, your changes are lost. A confirmation dialog appears when you try to leave with unsaved changes.
- Custom code is stored per screen and per area. The
Common,Home / Category,Post,Author, and404tabs at the top of the Design screen each keep their own code, and withinCommonthe Header, Banner, and Footer are separate boxes as well. Enter your code in the tab for the screen you want to change — for example, adjust the spacing of a post's body under thePosttab. - Broad CSS selectors such as
aorbuttoncan affect your entire blog. The editor shows a warning in that case — narrow the selector's scope if you want the rule to apply to one area only.
404 Error Page
- You can configure a custom 404 error page for when a user lands on a non-existent URL.
Mobile Preview Support
- "Your blog design is fully responsive." Preview how your blog looks on both desktop and mobile views directly from the editor.
Last updated 2026-09-24